Ultimate French Drain Installation: Proven Basement Waterproofing That Actually Works
Three years ago, I walked into my basement to grab Christmas decorations and stepped into what felt like a swamp. The concrete was wet, the air reeked of mildew, and I could literally see water seeping through the foundation walls during heavy rain.
That soggy mess taught me everything I know about basement waterproofing, proper drainage systems, and why throwing money at quick fixes never works. After months of research, trial and error, and getting my hands dirty with French drain installation, I figured out the real solutions that keep basements dry.
You don’t need to spend thousands on waterproofing companies that promise miracles. But you do need to understand why water gets in, how French drain installation actually works, and which basement waterproofing repairs you can tackle yourself versus when to call professionals.
Why Basements Turn Into Underground Pools
🧠 Understanding the real culprits behind basement flooding saves you from wasting money on the wrong fixes.
Most basement water problems aren’t mysterious. Water always follows the same rules: it flows downhill and finds the path of least resistance. When that path leads straight to your foundation, you get problems that French drain installation and proper basement waterproofing can solve.
Hydrostatic pressure is the biggest villain here. When soil around your foundation gets saturated from poor drainage, it creates constant pressure against basement walls. Think of it like your house sitting in a giant, invisible bathtub that’s always trying to push water inside.
Poor yard grading makes everything worse. Your yard should slope away from your house at least 6 inches over the first 10 feet. If water pools near your foundation instead of flowing away, you’re essentially watering your basement walls every time it rains. This is exactly the type of foundation water damage that French drain installation prevents.
Gutters and downspouts cause more basement flooding than most people realize. Those little splash blocks everyone uses? They’re practically useless. Water needs to be carried at least 10-15 feet away from your foundation, preferably underground where it can’t freeze or get redirected by landscaping.
Foundation cracks, failed sump pumps, and clogged walkout drains all contribute to the mess. But here’s what I learned the hard way: fixing these symptoms without addressing drainage through French drain installation is like mopping a floor while the sink overflows.
➡️ The early warning signs aren’t always obvious either. Efflorescence (those white, chalky deposits on concrete), humidity spikes, musty odors, or rusting metal in your basement all signal water intrusion before you see actual puddles.
What French Drain Installation Actually Does
✅ A French drain installation is essentially an underground highway that gives water a better path than your basement.
The concept is beautifully simple: dig a trench, line it with landscape fabric, fill it with graded gravel, and install a perforated pipe that carries water away from problem areas. The gravel acts like a collection system, and the pipe provides a controlled exit route.
Interior systems get installed around the perimeter of your basement floor, usually connected to a sump pump system.
Exterior systems go around the outside of your foundation, intercepting water before it reaches your basement walls.
Here’s what French drain installation systems excel at:
• Managing groundwater effectively through proper basement waterproofing • Relieving hydrostatic pressure against foundation walls
• Giving water a predictable path away from your foundation
• Working 24/7 without electricity
• Rarely clogging when French drain installation is done correctly
What French drain installation doesn’t do: It won’t fix major foundation cracks, stop water from coming through walls above ground level, or solve problems caused by poor grading or gutter issues. Think of French drain installation as one critical piece of a complete basement waterproofing strategy, not a magic bullet.
I’ve seen people install expensive French drain installation systems while ignoring obvious problems like downspouts dumping water right next to their foundation. That’s like installing a state-of-the-art sump pump in a boat with a hole in the hull.
Like many basement moisture control issues, the key is addressing the complete water management system, which you can learn more about in our guide to basement wall preparation that stops moisture.
French Drain Installation: Step-by-Step Breakdown
🔍 Getting the French drain installation right the first time saves you from digging up your yard twice.
Planning and Preparation
Before you touch a shovel, map out where water needs to go. French drain installation only works if it has somewhere to drain – either to a lower area of your yard, a storm drain, or a drywell system.
Call 811 at least 48 hours before digging. I cannot emphasize this enough. Hitting a gas line or electrical cable turns a weekend project into a life-threatening disaster and a massive insurance claim.
Measure the slope from your starting point to the exit. You need at least 1 inch of drop for every 8-10 feet of pipe. If your yard is dead flat, you’ll need a sump pump system or drywell to make your French drain installation work properly.
Materials You’ll Actually Need
📌 Having the right materials makes success much more likely:
• Perforated pipe: 4-inch corrugated or solid PVC works best for French drain installation
• #57 gravel: This specific grade drains well without washing through the pipe holes during French drain installation
• Heavy-duty geotextile landscape fabric: Cheap fabric tears during French drain installation and fails within a year
• Pop-up emitter or daylight outlet: Where the water exits your French drain installation system • Trenching shovel or mini excavator: Hand digging 100+ feet of French drain installation gets old fast
Installation Process
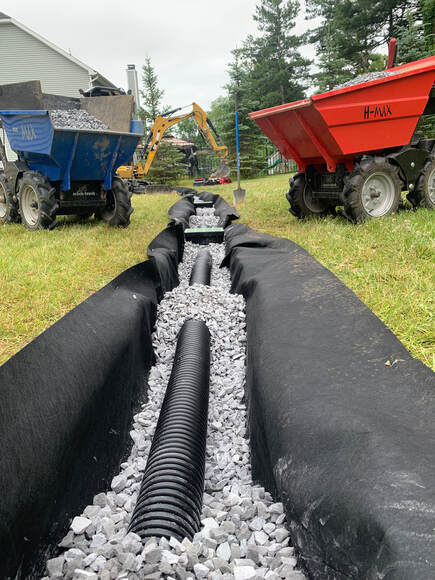
Step 1: Dig your trench 12-18 inches wide and deep enough to maintain proper slope. For exterior drainage around foundations, you’re looking at 2-4 feet deep minimum for effective water management.
Step 2: Line the entire trench with landscape fabric, leaving enough excess to wrap over the top later. This prevents soil from clogging your gravel bed.
Step 3: Add 2-3 inches of gravel to the bottom and level it to maintain proper slope throughout your system.
Step 4: Install the perforated pipe with holes facing down. This is counterintuitive but correct for French drain installation – the holes collect water from the gravel bed below, not from above.
Step 5: Cover the pipe with 6-8 inches of gravel, then wrap the landscape fabric over the top of your French drain installation.
Step 6: Backfill with soil and restore your landscaping over the completed French drain installation.
🔧 Pro tip: Install cleanout access points every 50-75 feet using solid pipe with removable caps. Future you will thank present you when French drain installation maintenance is needed.
Underground Gutter Extensions: The Missing Link
💡 Most basement water problems get solved by fixing what happens to roof water after it hits the ground.
Those plastic splash blocks and flexible downspout extensions everyone uses? They’re temporary bandaids that redirect problems rather than solving them. Underground gutter extensions actually eliminate the problem and work perfectly with French drain installation systems for comprehensive basement waterproofing.
Proper Downspout Drainage
Run solid 3-4 inch PVC pipe from each downspout to at least 10-15 feet away from your foundation. This isn’t the same as your main drainage system – it’s a separate network that handles roof water specifically and prevents foundation water damage.
Use solid pipe, not corrugated. Smooth-wall PVC moves water faster and clogs less often. Corrugated pipe is fine for French drains where flow speed isn’t critical, but roof water needs to move quickly during heavy storms.
➡️ Install a pop-up emitter at the end of each line. These spring-loaded outlets stay closed when dry (preventing rodents and debris) but pop open under water pressure. They’re worth the extra $15 per downspout and complement your basement waterproofing efforts.
Freeze protection matters in cold climates. Slope pipes properly so they drain completely, and consider installing them below frost line in areas with severe winters.
Sump Pump Discharge Lines
Your sump pump discharge needs its own underground route, separate from both main drainage systems and gutter extensions. Most sump pumps move water fast during heavy rain, and mixing these systems can cause backups that undermine your basement waterproofing.
Use solid 1.5-2 inch PVC for sump discharge lines. Install a check valve near the pump to prevent backflow, and make sure the exit point is lower than your basement floor level.
🚨 Common mistake: Connecting sump discharge to your drainage system. This can overwhelm the system during heavy pumping and reduces the effectiveness of both basement waterproofing components.
Basement Walkout Drains: The Forgotten Flood Risk
📌 That drain at the bottom of your basement steps floods more basements than homeowners realize.
If you have a walkout basement or basement entrance with steps, there’s probably a floor drain at the bottom designed to handle rainwater. These drains clog constantly and rarely get proper maintenance until they back up during storms, even when you have drainage systems protecting other areas.
Why Walkout Drains Fail
Debris accumulation is the main culprit that undermines basement moisture control:
• Leaves wash down steps and create dams around drain grates
• Mulch and grass clippings block water flow
• Soil buildup reduces drain capacity
• Ice formation in winter blocks drainage completely
Poor drainage design makes the problem worse. Many walkout drains connect to undersized pipes or discharge to areas that don’t drain well themselves, creating foundation water damage risks.
Cleaning and Maintenance
Monthly inspection: Pull up the grate and remove any visible debris. Use a shop vacuum to suck out accumulated sediment that could affect your basement waterproofing.
Quarterly flushing: Run a garden hose down the drain to check flow and clear minor blockages. If water backs up, you’ve got a clog somewhere in the line that needs attention.
Annual deep cleaning: Snake the drain line or use a pressure washer to clear stubborn blockages that normal maintenance misses.
🔧 Install a debris guard over the grate – a simple screen that catches leaves while allowing water through. Clean it weekly during fall when leaves are dropping.
Upgrading Problem Walkout Drains
If your walkout drain repeatedly clogs or can’t handle normal rainfall, consider connecting it to your main drainage system or installing a dedicated sump pump for that area.
Some walkout drains benefit from being enlarged or having catch basins installed to increase their capacity during heavy storms and improve overall basement moisture control.
For comprehensive home maintenance including drainage issues, check out our complete home cleaning tips guide that covers 25 genius strategies.
Basement Wall Cracks: Diagnosing What’s Fixable
🚨 Not all foundation cracks are created equal – knowing which ones need immediate professional attention can save your house.
Harmless Settling Cracks
Vertical hairline cracks under 1/8 inch wide are usually just concrete shrinkage during curing. If they’re dry, not growing, and not leaking, they’re mostly cosmetic and won’t interfere with your basement waterproofing efforts or drainage systems.
Small diagonal cracks at corners of basement windows or doors often result from normal house settling and aren’t structural concerns that affect basement moisture control.
These minor cracks can be sealed with concrete crack filler or hydraulic cement for peace of mind, but they rarely cause water problems on their own when you have proper drainage.
Warning Signs That Require Professional Help
Horizontal cracks indicate serious pressure against your foundation wall and potential structural failure. These need immediate professional evaluation before any drainage work begins.
Stair-step cracks in concrete block foundations suggest the wall is shifting or bowing outward under soil pressure, which can compromise basement waterproofing efforts.
Cracks wider than 1/4 inch or any crack that’s actively growing should be assessed by a structural engineer before attempting basement waterproofing repairs.
Active leaks through cracks mean you have both a structural issue and a water management problem that require coordinated solutions, possibly including exterior drainage systems.
DIY Crack Repair Methods
For small, stable cracks that occasionally seep water, polyurethane injection kits work well as part of your basement waterproofing strategy. These expand to fill the crack completely and remain flexible as the foundation moves slightly.
💡 Hydraulic cement stops active leaks quickly and can be applied even when water is flowing. Mix small batches and work fast – this stuff sets up in 3-5 minutes.
Epoxy injection provides the strongest repair for structural cracks but requires the crack to be completely dry during application.
Interior sealing with products like Drylok can handle minor moisture seepage through walls, but won’t stop significant leaks or address underlying drainage problems that proper systems solve.
Learn more about identifying foundation problems in our comprehensive home safety tips guide from a veteran dad.
Sump Pump Maintenance and Troubleshooting
🔧 A well-maintained sump pump prevents more basement floods than any other single investment in basement waterproofing.
Regular Sump Pump Cleaning
Monthly during rain season: Test your pump by pouring water into the basin until the float activates. The pump should start immediately and lower the water level quickly, supporting your drainage system.
Quarterly deep cleaning: Unplug the pump and remove it from the basin. Clean accumulated sediment, check the float switch for free movement, and inspect the discharge pipe for clogs that could affect basement moisture control.
Annual inspection: Remove the pump entirely and clean the basin with a shop vacuum. Check the check valve, inspect power cords for damage, and verify the backup system (if installed) works properly.
Common Sump Pump Repairs
➡️ Pump won’t start: Check power first, then clean the float switch. Sediment often prevents floats from rising properly, which can compromise your basement waterproofing.
➡️ Pump won’t stop running: Usually caused by a stuck float switch or failed check valve allowing water to flow back into the basin.
➡️ Pump runs but doesn’t move water: Clogged impeller or discharge line. Remove the pump and clear debris from the intake screen.
➡️ Loud noises during operation: Often indicates worn bearings or debris in the impeller housing.
Eliminating Sump Pump Odors
Standing water smell develops when water sits in the basin between pumping cycles. Add 1 cup of bleach monthly to control bacteria growth that can undermine your basement waterproofing efforts.
Sewer gas odors suggest your sump basin connects to floor drains or has inadequate venting. This requires professional plumbing assessment.
Musty basement smells often improve dramatically once sump pump maintenance eliminates moisture sources and improves air circulation, working hand-in-hand with your drainage system.
For more natural cleaning solutions that support healthy basement environments, see our guide to natural cleaning methods that actually work.
Sealing Basement Walls: Interior vs Exterior Solutions
✅ Understanding when interior sealing works versus when you need exterior basement waterproofing saves thousands in wasted effort.
Interior Sealing Methods
Paint-on sealants like Drylok work for minor dampness and humidity control as part of comprehensive basement waterproofing. They’re easy to apply and relatively inexpensive, but they won’t stop significant water intrusion that requires drainage systems.
Crystalline waterproofing penetrates concrete pores and forms crystals that block water passage. More effective than surface sealants but still limited to minor seepage when used with exterior drainage for foundation water damage prevention.
Interior basement sealing handles condensation, minor moisture seepage, and improves the overall basement environment. It’s not a solution for active leaks or drainage problems that require exterior systems.
Exterior Waterproofing Solutions
Excavation and membrane application provides the most comprehensive basement waterproofing but requires significant investment and landscape disruption. This works best when combined with proper drainage.
Elastomeric membranes applied to exterior foundation walls create a continuous moisture barrier from below grade to above ground level, preventing foundation water damage.
Dimple board systems combine basement waterproofing with drainage, creating an air gap that allows any moisture to drain harmlessly to your main drainage system.
Exterior basement waterproofing makes sense when you have multiple foundation issues, significant structural problems, or interior solutions have failed repeatedly despite proper drainage systems.
Choosing the Right Approach
🔍 Try interior solutions first for minor dampness, especially if your exterior drainage systems are working properly. Many basement moisture control problems get solved with dehumidification and minor sealing.
🔍 Consider exterior work when you see active leaks, structural cracks, or interior methods haven’t controlled the problem after proper drainage installation.
🔍 Combine approaches for best results – install proper drainage systems and fix exterior issues, then seal interior walls to handle any remaining moisture for complete basement waterproofing.
Complete Yard Drainage Strategy
🌧️ French drain installation works best as part of a comprehensive approach that addresses water before it becomes a basement problem.
Proper Yard Grading
Your yard should slope away from your house foundation at least 6 inches over the first 10 feet. This single improvement prevents more basement water problems than any other landscaping decision and makes your drainage systems more effective at preventing foundation water damage.
Regrading problem areas requires adding topsoil near the foundation and creating smooth transitions to lower areas. Don’t just pile dirt against your foundation – extend the slope gradually to avoid creating new drainage problems elsewhere that could overwhelm your systems.
Maintain proper grading after landscaping projects. Mulch, new plantings, and hardscaping changes can accidentally redirect water toward your foundation and overwhelm your drainage, compromising basement moisture control.
Dry Wells for Overflow Management
Dry wells absorb excess water in areas where slope drainage isn’t possible. They’re essentially underground gravel pits that collect and slowly release water into surrounding soil, working perfectly with drainage systems for comprehensive basement waterproofing.
Install dry wells at low points in your yard or as terminal points for drainage systems. Size them based on your area’s rainfall patterns and soil drainage characteristics.
💡 Dry well maintenance involves periodic inspection and sediment removal, typically every 3-5 years depending on local soil conditions.
Rain Gardens and Natural Solutions
Rain gardens combine effective drainage with attractive landscaping. These shallow depressions planted with water-tolerant plants naturally absorb runoff and filter groundwater, supporting your drainage efforts.
Position rain gardens to intercept water from roof drainage, main drainage systems, or natural yard flow patterns. They’re particularly effective in areas with clay soil that doesn’t drain quickly and helps prevent foundation water damage.
The EPA provides excellent rain garden design guidelines for different climate zones and soil types, including plant selection and sizing recommendations.
DIY vs Professional Installation: Making Smart Decisions
💡 Knowing which projects you can handle versus when to hire professionals saves money while avoiding costly mistakes.
Projects Most Homeowners Can Handle
✅ Drainage system trenching in accessible areas with reasonable depth requirements and good soil conditions. Hand digging 50-100 feet is manageable for most people over a weekend.
✅ Underground gutter extensions involve straightforward trenching and pipe installation. The techniques are simple, and mistakes aren’t usually catastrophic for your basement waterproofing.
✅ Basic sump pump maintenance and replacement falls within most homeowners’ skill levels. The plumbing is simple, and electrical connections are typically plug-in.
✅ Interior crack sealing for small, stable cracks requires no special skills beyond careful preparation and following product instructions.
✅ Walkout drain cleaning and minor repairs involve basic maintenance that prevents bigger basement moisture control problems.
When to Call Professionals
❌ Deep excavation around foundations requires proper safety procedures, soil stability knowledge, and often machinery access for effective drainage work.
❌ Structural foundation repairs need professional assessment and specialized materials. Getting these wrong can compromise your entire house and basement waterproofing investment.
❌ Exterior basement waterproofing systems involve complex coordination of drainage, waterproofing, and backfill procedures that require experience.
❌ Electrical work for sump pumps, especially backup systems and transfer switches, requires licensed electricians in most areas. Note: If you are handy, this can still be managed as DIY.
❌ Major yard regrading often needs machinery and expertise to avoid creating new drainage problems elsewhere on your property that could affect your systems.
Cost-Benefit Analysis
DIY drainage work typically costs $3-8 per linear foot in materials versus $15-25 per foot professionally installed. For 100 feet, that’s $300-800 versus $1,500-2,500.
Professional exterior basement waterproofing runs $80-150 per linear foot but includes excavation, membrane application, and proper backfill – work that’s difficult and risky for homeowners.
Hybrid approach works well for many families: tackle the straightforward drainage work yourself, then hire professionals for complex foundation repairs or structural issues that could compromise basement moisture control.
Check out our DIY home and garden project guide for more decision-making tips on when to tackle projects yourself.
My Family’s Real-World Waterproofing Results
Three years after that soggy Christmas decoration discovery, our basement stays completely dry even during severe storms. Here’s what actually worked and what I’d do differently with our drainage and basement waterproofing approach.
What we tackled ourselves: Installing 150 feet of drainage around two sides of the foundation, burying all four downspout extensions, cleaning and upgrading the walkout drain system, and sealing minor interior wall cracks.
Total DIY investment: About $800 in materials and three long weekends of work. The French drain installation was the most physically demanding part, but the trenching went faster than expected once we rented a small trencher.
What we hired professionals for: Exterior foundation membrane application on the problematic south wall where we had active leaks and some structural cracks. This cost $2,200 but solved basement waterproofing problems that interior methods couldn’t touch.
Results after three years: Zero basement water intrusion, even during record rainfall. The musty odor disappeared completely, humidity stays manageable, and we’ve had no new foundation cracks.
🏆 What I’d do differently: Start with the exterior membrane work first, then add the drainage system. We could have saved some excavation costs by coordinating these basement waterproofing projects better.
The key lesson: comprehensive drainage solutions work better than piecemeal fixes. Addressing gutters, yard grading, proper drainage, and foundation issues together provides reliable, long-term basement waterproofing results that prevent foundation water damage.
Long-Term Basement Waterproofing Maintenance
🏠 Keeping your basement dry requires consistent maintenance of the systems that protect it.
Quarterly gutter cleaning prevents overflow that overwhelms your underground drainage systems. Clean gutters move water efficiently to your downspout extensions instead of cascading over the sides near your foundation, supporting your drainage effectiveness.
Sump pump testing every month during rain season catches problems before they cause floods. Pour water into the basin, verify the pump starts quickly, and confirm the discharge line flows freely to maintain basement moisture control.
Drainage system inspection annually or after severe storms. Check that pop-up emitters open properly, watch for standing water in low areas, and clear any visible debris from drainage exits.
Foundation crack monitoring with simple measurements and photos helps you catch developing problems early. Small cracks that grow or begin leaking need prompt attention to protect your basement waterproofing investment.
📅 Maintenance Schedule for Basement Waterproofing: • Monthly: Sump pump testing, walkout drain inspection, drainage system visual check • Quarterly: Gutter cleaning, comprehensive drainage assessment • Annually: Complete drainage system evaluation • After storms: Pop-up emitter function check, standing water evaluation
Yard drainage assessment after landscaping changes, severe weather, or seasonal freeze-thaw cycles. Verify that water still flows away from your foundation and doesn’t pool in new problem areas that could overwhelm your drainage.
Basement humidity control with dehumidifiers during humid seasons reduces condensation that can mimic water intrusion problems. Keep humidity below 50% to prevent mold and mildew issues that compromise basement moisture control.
Professional drainage system inspection every 5-7 years helps catch problems before they become expensive emergencies. A drainage contractor can camera-inspect underground lines and assess system performance.
Remember: an ounce of prevention is worth a pound of cure applies perfectly to basement waterproofing. Regular maintenance of your drainage and related systems prevents the vast majority of water intrusion problems while protecting your investment in basement waterproofing solutions.
Advanced Basement Waterproofing Techniques
🔧 For homes with persistent water issues, these advanced methods complement proper drainage perfectly.
Membrane Systems and Vapor Barriers
Applied membranes create continuous waterproof barriers when properly installed with drainage systems. These work especially well for basement waterproofing in areas with high water tables that create severe foundation water damage risks.
Vapor barrier installation prevents moisture migration through concrete and pairs perfectly with interior drainage for comprehensive basement waterproofing that addresses basement moisture control at multiple levels.
Drainage Board and Air Gap Systems
Dimple board installation creates air gaps that allow water to drain to your main drainage system rather than pressing against foundation walls, preventing foundation water damage.
These systems work exceptionally well when combined with exterior drainage and provide backup protection for your basement waterproofing investment.
Professional Injection Systems
For homes requiring extensive basement waterproofing, professional-grade injection systems can seal multiple cracks simultaneously and integrate with proper drainage for comprehensive protection against basement moisture control problems.
The techniques and systems we’ve covered work reliably when installed and maintained properly. Your basement can stay dry year-round without constant worry about water damage, mold, or expensive emergency repairs.
Proper drainage, combined with comprehensive basement waterproofing techniques, provides the moisture control that protects your home investment and family health for decades. When you address foundation water damage prevention through strategic drainage and basement moisture control, you’re investing in long-term peace of mind.
Check out my guide on GUMROAD titled “New Homeowner Drainage & Leak Survival Guide (Foundations Edition)”
You’ll get a clear, step-by-step system for diagnosing water problems in your home, with practical decision rules that help you determine what’s safe to fix yourself, what needs monitoring, and when it’s time to call a professional. The guide walks through common exterior drainage issues, interior plumbing and moisture problems, seasonal water threats, and condensation misdiagnoses, all explained in plain language. You’ll also learn how to properly document issues for insurance or contractors, reduce panic when water appears, and prevent small problems from turning into expensive repairs.
Explore More from Our Family of Blogs
Mountains Will Move
Faith-based encouragement for everyday families.
Everyday Exposed
No-filter truth hub for critical thinking and clarity.
Thank you for being part of the community. God Bless you and your family.
